Going forward, I will be posting on Wordpress.
Please find me at www.savorygourmet.wordpress.com

Sunday, May 15, 2011
Wednesday, May 11, 2011
family holiday punch
Jeff's family always has the Kanwischer punch at holidays. It's like a special treat loved by all - kids and adults. So simple, and so yummy. Frozen, frothy and sweet.

raspberry sherbet (softened a little)
ginger ale (chilled)
That's it. Two ingredients. Be sure to soften the sherbet to make it easier on the hand mixer. Add ginger ale in segments. Using a hand mixer, mix the sherbet and ginger ale until mixed well and a froth forms on top. Continue to add ginger ale to taste. Can also add ice cubes to keep the punch chilled. Serve in a punch bowl.
Tuesday, May 10, 2011
salt 'n vinegar roasted smashed potatoes
Salt 'n' Vinegar Roasted Smashed Potatoes
adapted from Everyday Food
serves 4


1 1/2 lbs. small round or fingerling potatoes (I bought the assorted mix at Trader Joe's - small baby reds, whites and blues)
coarse sea salt
cracked black pepper
2 tbsp. extra virgin olive oil
1/4 c. malt vinegar (I didn't have, so substituted apple cider vinegar.)
You can make these potatoes ahead of time. Boil and smash them, cover and refrigerate overnight, then finish them in the oven the next day.
In medium pot, bring potatoes to a boil over high in salted water. Reduce heat and cook at a rapid simmer until potatoes are tender when pierced with a knife, about 20 minutes; drain. Place a folded dish towel on a work surface and place a potato inside. Gently smash potato so that it is flattened but still in one piece (edges will be split). Repeat with remaining potatoes.
Preheat oven to 450 degrees. Brush a rimmed baking sheet with 1 tbsp. oil. Place potatoes on sheet and brush tops with 1 tbsp. oil. Bake until crisp and golden, 35 minutes, flipping them halfway through. Remove from oven, toss with vinegar, and season with salt and pepper.
Monday, May 9, 2011
curried chicken salad
This is a nice chicken salad recipe. I didn't have yogurt or cashews, but the recipe was still a success. Adjust the level of curry to your liking.
Curried Chicken Salad
adapted from Gourmet
makes 6 servings
1 3/4 cups chicken broth
1 1/2 lb. skinless boneless chicken breast (I used rotisserie chicken pulled from the bone and cut into 1/2 inch pieces)
1/2 cup mayonnaise
1/3 cup plain yogurt
5 tsp. curry powder (I used a little less than 4 tsp., but spice to your liking)
1 Tbsp. fresh lime juice
1 tsp. honey
1/2 tsp. ground ginger
1/2 tsp. salt
1/4 tsp. black pepper
1 medium red onion, chopped (1 cup)(Can also use sliced green onion)
1 firm ripe mango, peeled, pitted and chopped
1 cup red seedless grapes, halved
1/2 cup salted roasted cashews, coarsley chopped
**Note** This step can be omitted if you are using rotisserie chicken. Bring 4 cups water to a simmer with chicken brother in a 2-3 quart saucepan. Add chicken and simmer, uncovered, 6 minutes. Remove pan from heat and cover, then let stand until chicken is cooked through, about 15 minutes. Transfer chicken to a plate and cool 10 minutes. Chop into 1/2 inch pieces.
Whisk together mayonnaise, yogurt, curry, lime juice, honey, ginger, salt and pepper in a large bowl. Add chicken, onion, mango, grapes, and cashews and stir gently to combine.
Serve on a croissant or by itself. Enjoy.
Friday, May 6, 2011
elegance on a wooden slab
Cheese Plates. Such an impression and oh, so grand. My sister, Kortney introduced me to a proper cheese plate. Before that, I was a basic extra extra sharp cheddar and pepper jack girl. However, I still crave a good chunk of extra extra sharp cheddar cheese. And, I've graduated from basic pepper jack to Costco's habanero cheddar cheese. mmmmm...
A proper cheese plate can vary each and every time. Flexibility and variety are what make them so special. Start out with an attractive wooden block or cheese plate and load it up with goods. My favorite cheese combinations include: port salut, gouda, blue, manchego, Jarlsberg, goat cheese, sometimes an aged cheddar... by the way... Trader Joe's has the best deals on specialty cheeses. I always shop there. Costco also has good deals, but in larger quantities. Serve the cheese platter with a nice selection of wines.
This display happens to be pretty plain, but I didn't have all my goods when I took the picture.

I like to add sliced pears/apples, walnuts, grapes, mixed greens with balsamic vinaigrette. Serve with toasted crostini, multigrain crackers, i.e. Breton brand, etc. One of the best combinations is a pear slice with walnuts and blue cheese. OMG. yum. Almost always is the cheese devoured and gone by the end of the night. Enjoy!

Thursday, May 5, 2011
a rally cry - i heart butterscotch
Every so often, I treat myself to a Dairy Queen (my favorite, favorite ice cream place.) My usual indulgences vary from a plain jane vanilla cone to a candy crunch dipped cone to a butterscotch dipped cone to a dilly bar to a butterscotch shake to a Hawaiian blizzard to a Mr. Misty float or freeze.
This particular day (only a few days ago), I was craving a butterscotch shake. I pulled up to my local Dairy Queen drive thru and ordered one. My drive thru teller didn't even catch it right away. I proceeded to the pay window and then she told me. I was shocked to hear that the butterscotch syrup I loved so dearly was discontinued - and - over a year ago. I settled for a chocolate banana shake.
OK, here are my rants on the subject...
#1. Why? Why was butterscotch taken away? Could I be one of the lone customers who orders a butterscotch shake? Was it really too much to ask to keep it on their menu? Was caramel truly a viable "substitute" for butterscotch? Why would they even offer as a substitute? Why would they offer the butterscotch formula they use as a cone dip as a substitute? They said it would be like a "butterscotch chip" shake. I didn't want a butterscotch chip shake. Just butterscotch. Was it really necessary to consolidate choices for their customers?
I mean, really...
Only a few years ago, Dairy Queen discontinued fresh, shredded coconut and substituted toasted coconut instead - just a word on that one - the comparison is by no means a comparison. Fresh vs. toasted coconut? Na.
#2. As weird as it sounds, I was somewhat relieved that the butterscotch had been discontinued over a year ago and only now had I just learned of it. Which means I don't have as much of an "issue" as I thought I had with ice cream cravings. Yay!
#3. Also, a few months ago, I was trying to find a butterscotch syrup to replace the empty one in my fridge at home. I could not find the right syrup - anywhere... in any of the grocery stores I frequent. Lots of caramel and caramel combinations, but no butterscotch. Ugh.
Bring back the butterscotch... pleeeaaaase. Dairy Queen?
Wednesday, May 4, 2011
mom's ribs
My mom made these for us during their weekend visit for Grandparent's Day at the kids' school. The ribs were tender; the meat practically fell of the bone and they were amazing. Serve with a side of sweet corn, maybe a baked potato and a Newcastle or a Surly Bender and call it good.

2 slabs baby back pork ribs (1 slab seasoned with Cajun Street seasoning, kosher salt, cracked pepper; 1 slab seasoned with Tastefully Simple Onion Onion and Garlic Garlic seasoning, kosher salt, cracked pepper)
Preheat oven to 325 or 350 degrees. Wrap slabs in aluminum foil and place on a large cookie sheet. Bake ribs for about 1 1/2 hours, remove from oven and slather Sweet Baby Ray's barbecue sauce over the tops, rewrap in foil and continue to bake for another half hour or so until done. I like to control the amount of barbecue sauce on my ribs - I lean towards less sauce. Use as sparingly or as generous as you like. And, serve extra sauce on the side, if necessary.
You can also finish the ribs with a quick direct heat on the grill or in the oven using the broiler option. This will give them a nice touch of crispy on the outside. Enjoy. And be sure to have lots of extra hand towels and bibs around...
Tuesday, May 3, 2011
haricot verts with bacon and onion
Haricot Verts with Bacon and Onion
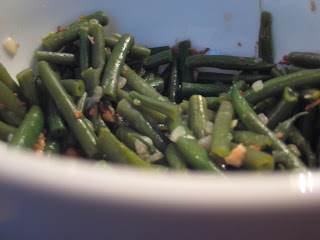
1 1/2 lb. fresh green beans (haricot verts / french green beans)
2 cups water
1 tablespoon sugar
1/2 teaspoon pepper
4 ounces bacon, diced (raw)
4 ounces diced onions
Using a colander, thoroughly drain green beans. Set aside.
Mix water, sugar and pepper until well incorporated. Set aside.
Preheat your cooking pan to Medium High heat.
Raw Bacon Method.
Using a cutting board and a knife, dice the raw bacon into equal size pieces. Place diced bacon into preheated cooking pan. Continually stir bacon with large spoon to keep the bacon from burning.
Once bacon is cooked add the onions and cook until they are tender and light brown.
Now that the onions are tender add the liquid mixture and the beans.
Using the rubber spatula stir the mixture until incorporated.
Bring mixture to a boil and turn heat to simmer. Serve beans as soon as you are ready.
Monday, May 2, 2011
seared scallops with lemon aioli
Searing scallops is most definitely an art. I have unsuccessfully tried searing them myself, and no matter how much I pat them dry, they seem to end up "boiling" in the pan and I cannot seem to get the caramelized, crispy brown top and bottom.
I had Jeff take over this time and he perfected them with such ease. He's convinced you need a combination of olive oil and butter at just the right heat. I had originally tried with just olive oil and it didn't work for me. Now, I think I have the secret for next time.
We bought the Costco frozen scallops in a bag. They were delicious. And, even better with the lemon aioli. We served them with grilled filet mignon and veggies. The aioli was also a nice complement to our side of vegetables - roasted potatoes and haricot verts. Enjoy.

Seared Scallops
Fresh or frozen & thawed scallops (patted completely dry)
Butter
Olive Oil
Kosher Salt
Cracked Black Pepper
Heat stainless steel skillet over med-high heat and melt about 1 tbsp. butter and 1 tbsp. olive oil in the pan, until hot, but not smoking. Season scallops with salt & pepper. Sear scallops in pan, uncovered for 2-3 minutes per side (or until caramelized brown on top and bottom and cooked through.) Be careful not to overcook, as the scallops will get rubbery. Serve hot with lemon aioli.

Lemon Aioli
1 cup mayonnaise
1/2 cup fresh lemon juice
1 tsp. black pepper
1 tbsp. chopped fresh chives (or red onion)
Whisk ingredients together until mixed well.
Friday, April 29, 2011
raspberry buttermilk cake
I made this as one of my Easter desserts this year. I really thought it turned out well, however, next time, I may add a few more berries and maybe not bake as long.
The raspberries were fresh from my mother-in-law's garden. They were frozen at the end of last year's gardening season, so we thawed them, removed the excess moisture and they were more flavorful than grocery store bought raspberries.
I used a springform pan - makes it easy to cut the cake when you can remove the sides of the pan. I also forgot to line my pan with parchment paper, but it was all good.
Raspberry Buttermilk Cake
Adapted from Gourmet
Isn't it pretty? Pillows of cake that seem to swallow up the raspberries. mmmm.

Serves 6
1 cup all-purpose flour
1/2 teaspoon baking powder
1/2 teaspoon baking soda
1/4 teaspoon salt
1/2 stick unsalted butter, softened
2/3 cup plus 1 1/2 tablespoons sugar, divided
1/2 teaspoon pure vanilla extract
1 large egg
1/2 cup well-shaken buttermilk
1 cup fresh raspberries (about 5 oz); or frozen raspberries (thawed & drained well) You can also substitute with other types of berries.
Preheat oven to 400°F with rack in middle. Butter and flour a 9-inch round cake pan or springform pan. Whisk together flour, baking powder, baking soda, and salt. Beat butter and 2/3 cup sugar with an electric mixer at medium-high speed until pale and fluffy, about 2 minutes, then beat in vanilla. Add egg and beat well. At low speed, mix in flour mixture in 3 batches, alternating with buttermilk, beginning and ending with flour, and mixing until just combined. Spoon batter into cake pan, smoothing top. Scatter raspberries evenly over top and sprinkle with remaining 1 1/2 Tbsp sugar. Bake until cake is golden and a wooden pick inserted into center comes out clean, 25 to 30 minutes. (I took my cake out of the oven at 20 minutes. Cool in pan 10 minutes, then place onto a rack and cool to warm, 10 to 15 minutes more. Dust the top with confectioner's sugar, cut and serve with real whipped cream.

Thursday, April 28, 2011
tangerine-glazed easter ham with baby carrots
My mom made this recipe for our Easter meal this year and it was amazing. Filled the house with an aroma so divine - and, the best part...the ham tasted just as divine. The carrots were a nice addition as well. Serve with scalloped potatoes and a glass of chilled white wine. Mmmmm. This recipe is a keeper for sure!
By the way, bone-in hams are hands down, the best ever. Don't even waste your time with a boneless ham.
Photo courtesy of Food Network

Tangerine-Glazed Easter Ham With Baby Carrots
Adapted from Tyler Florence
Serves:
10 to 12 servings
1 (8 to 10-pound) smoked ham, bone-in, skin on
Kosher salt and freshly ground black pepper
1 bunch fresh sage leaves
1/4 cup extra-virgin olive oil
1 cup (2 sticks) unsalted butter, cut in chunks
2 tangerines, sliced thin, seeds removed
2 cups tangerine juice
2 cups light brown sugar, packed
1 cup water
1/4 teaspoon whole cloves
2 cinnamon sticks
11/2 pounds carrots, peeled
Preheat the oven to 300 degrees F.
Put the ham in a large roasting pan, fat-side up. Using a sharp knife, score the ham with cuts across the skin, about 2-inches apart and 1/2-inch deep. Cut diagonally down the slashes to form a diamond pattern; season the meat generously with salt and pepper. Chop about 8 of the sage leaves and put it in a bowl; mix with the oil to make a paste. Rub the sage-oil all over the ham, being sure to get the flavor into all the slits. Bake the ham for 2 hours. Now there is plenty of time to bang-out the tangerine glaze.
For the glaze: Place a saucepan over medium heat. Add the chunks of butter, tangerines, tangerine juice, brown sugar, water, and spices. Slowly cook the liquid down to a syrupy glaze; this should take about 30 to 40 minutes.
After the ham has being going for a couple of hours, pour the tangerine glaze all over it, with the pieces of fruit and all. Scatter the remaining sage leaves on top and stick the ham back in the oven and continue to cook for 11/2 hours, basting with the juices every 30 minutes.
Scatter the carrots around the ham and coat in the tangerine glaze. Stick the ham once again back in the oven and cook for a final 30 minutes, until the carrots are tender, the ham is dark and crispy, and the whole thing is glistening with a sugary glaze.
Set the ham on a cutting board to rest before carving. Serve the carrots and tangerine glaze on the side.
Wednesday, April 27, 2011
grandma kathleen's meatballs with sauerkraut
This recipe is a.maz.ing. A hearty, German-Hungarian dish, as my grandma says. One of those, do-it-ahead recipes that takes a little prep time, but once the prep is done, you let the crockpot do its magic. Seems it's become a staple at our family get togethers.
grandma's meatballs
 3 lbs. hamburger
1 1/2 onions, chopped
2 eggs
1 1/4 c. long-grain white rice
big jar of sauerkraut
large can of tomato juice
Spice hamburger to taste with salt, pepper, garlic salt, paprika, chili powder. Mix together with uncooked rice and eggs. Put layer of sauerkraut on bottom of crockpot. Form meatballs about size of golf balls (or bigger). Layer meatballs with sauerkraut ending with layer of sauerkraut. Pour tomato juice over until visible on top layer. Cook at least 6 hrs. on high, turn to low if meatballs cooking too fast. Serve with potatoes and you've got yourself some comfort food...
grandma's meatballs

1 1/2 onions, chopped
2 eggs
1 1/4 c. long-grain white rice
big jar of sauerkraut
large can of tomato juice
Spice hamburger to taste with salt, pepper, garlic salt, paprika, chili powder. Mix together with uncooked rice and eggs. Put layer of sauerkraut on bottom of crockpot. Form meatballs about size of golf balls (or bigger). Layer meatballs with sauerkraut ending with layer of sauerkraut. Pour tomato juice over until visible on top layer. Cook at least 6 hrs. on high, turn to low if meatballs cooking too fast. Serve with potatoes and you've got yourself some comfort food...
Tuesday, April 26, 2011
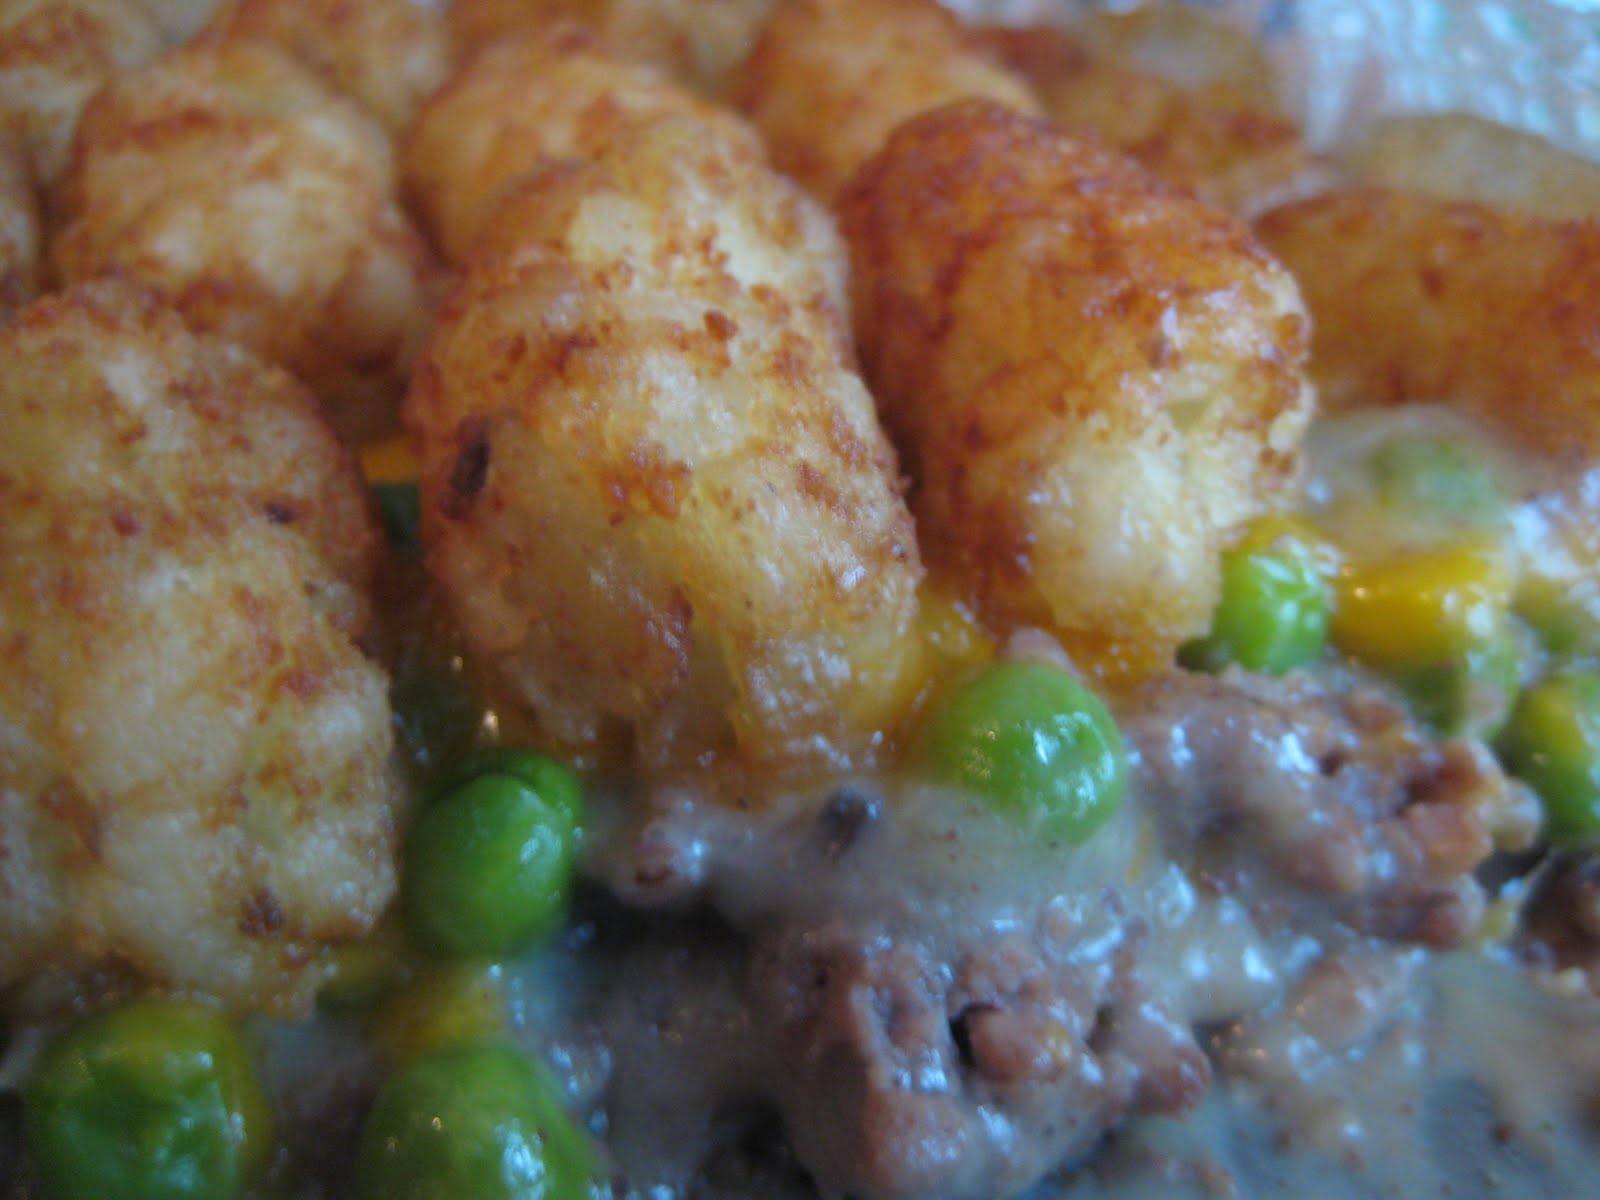
good ole' tater tot hotdish
Tater Tot Hot Dish (TTHD) Ahhh. Hot dishes. This is just one of many, but treasured comfort food which I crave often in the cold winter months - and this year, on cold spring days. Easy to make ahead, ready to pop in the oven the next day. Not on the top of my fresh and healthy list, but I can deal with a meal like this every once in awhile. My family loves this too, so it's fun to make. I get the "what's for dinner?" and when I respond with TTHD, I get lots of oohs and ahhs. I'm not the short order cook kind of mom, so it's always nice when I can get at least 75% thumbs up on the dinner choice.
No real recipe on this one either. Fairly easy to whip up and can modify with all sorts of add-ins each time. (I like to throw a few veggies in there so everyone gets part of their daily quota. Not as easy to push to the side, and somewhat disguised amongst the other ingredients.)

It usually goes something like this...
Tater Tot Hotdish
1 1/2 to 2 lbs. ground beef
1/2 onion, chopped
1 can cream of mushroom soup
1 can cream of celery soup
1/2 bag frozen peas or corn
1 bag shredded cheddar cheese
1 bag of tater tots
Preheat oven to 350 degrees. Brown beef and onion until done. Drain fat. Season with salt & pepper and any other seasonings. Mix cooked beef/onions with cans of soup and spread in bottom of a greased 9x13 baking dish. Top with peas or corn and sprinkle cheese on top. Finish by lining tater tots across the entire top of the dish. Bake for about an hour, until bubbly on the edges and hot in the center.
No real recipe on this one either. Fairly easy to whip up and can modify with all sorts of add-ins each time. (I like to throw a few veggies in there so everyone gets part of their daily quota. Not as easy to push to the side, and somewhat disguised amongst the other ingredients.)
It usually goes something like this...
Tater Tot Hotdish
1 1/2 to 2 lbs. ground beef
1/2 onion, chopped
1 can cream of mushroom soup
1 can cream of celery soup
1/2 bag frozen peas or corn
1 bag shredded cheddar cheese
1 bag of tater tots
Preheat oven to 350 degrees. Brown beef and onion until done. Drain fat. Season with salt & pepper and any other seasonings. Mix cooked beef/onions with cans of soup and spread in bottom of a greased 9x13 baking dish. Top with peas or corn and sprinkle cheese on top. Finish by lining tater tots across the entire top of the dish. Bake for about an hour, until bubbly on the edges and hot in the center.
Monday, April 25, 2011
carrot cake with cream cheese frosting
Jeff and my kids LOVE carrot cake. I made this for Jeff's birthday one year and Brendan requested it for his first communion celebration. This year, I made it for our Easter Sunday dessert. It's fabulous with a nice cup of coffee.

Alton Brown's carrot cake with cream cheese frosting
Makes 1 (9-inch) cake
Unsalted butter, for the pan
12 ounces, approximately 2 1/2 cups, all-purpose flour, plus extra for pan
12 ounces grated carrots, medium grate, approximately 6 medium
1 teaspoon baking powder
1 teaspoon baking soda
1/4 teaspoon ground allspice
1/4 teaspoon ground cinnamon
1/4 teaspoon freshly ground nutmeg
1/2 teaspoon salt
10 ounces sugar, approximately 1 1/3 cups
2 ounces dark brown sugar, approximately 1/4 cup firmly packed
3 large eggs
6 ounces plain yogurt
6 ounces vegetable oil
Cream Cheese Frosting, recipe follows
Preheat oven to 350 degrees F.
Butter and flour a 9-inch round and 3-inch deep cake pan. Line the bottom with parchment paper. Set aside.
Put the carrots into a large mixing bowl and set aside.
Put the flour, baking powder, baking soda, spices, and salt in the bowl of a food processor and process for 5 seconds. Add this mixture to the carrots and toss until they are well-coated with the flour.
In the bowl of the food processor combine the sugar, brown sugar, eggs, and yogurt.
With the processor still running drizzle in the vegetable oil. Pour this mixture into the carrot mixture and stir until just combined. Pour into the prepared cake pan and bake on the middle rack of the oven for 45 minutes. Reduce the heat to 325 degrees F and bake for another 20 minutes or until the cake reaches 205 to 210 degrees F in the center.
Remove the pan from the oven and allow cake to cool 15 minutes in the pan. After 15 minutes, turn the cake out onto a rack and allow cake to cool completely. Frost with cream cheese frosting after cake has cooled completely.
Cream Cheese Frosting:
8 ounces cream cheese
2 ounces unsalted butter, room temperature
1 teaspoon vanilla extract
9 ounces powdered sugar, sifted, approximately 2 cups
In the bowl of a stand mixer with paddle attachment, combine the cream cheese and butter on medium just until blended. Add the vanilla and beat until combined. With the speed on low, add the powdered sugar in 4 batches and beat until smooth between each addition.
Place the frosting in the refrigerator for 5 to 10 minutes before using.
Yield: approximately 2 cups
Friday, April 22, 2011
sloppy joes
My kids LOVE sloppy joe night. I don't have a recipe for them, but usually throw similar ingredients together and it seems to turn out about the same each time. I like various versions of sloppy joes - sweet, spicy and the one that has the chicken gumbo soup in it.

Here's the one I usually make:
Sloppy Joes
1 - 2 lbs. ground beef
1 small onion, chopped
1/2 green pepper, chopped
Salt & pepper
Brown ground beef with onion & green pepper and salt/pepper until beef is cooked through and the vegetables become soft.
I usually open my spice cabinet, which looks like this:
 and I start adding whatever looks interesting.
Add about 1/2 tsp. each of garlic powder, coriander, onion powder. I sometimes add mustard seed. Can also add dash of crushed red pepper. Add about a 1/2 to 3/4 cup ketchup and a couple of tablespoons yellow mustard. Also add about 1/2 to 3/4 cup water and let everything simmer on low for about 15-20 minutes. Serve on buns.

Here's the one I usually make:
Sloppy Joes
1 - 2 lbs. ground beef
1 small onion, chopped
1/2 green pepper, chopped
Salt & pepper
Brown ground beef with onion & green pepper and salt/pepper until beef is cooked through and the vegetables become soft.
I usually open my spice cabinet, which looks like this:

Add about 1/2 tsp. each of garlic powder, coriander, onion powder. I sometimes add mustard seed. Can also add dash of crushed red pepper. Add about a 1/2 to 3/4 cup ketchup and a couple of tablespoons yellow mustard. Also add about 1/2 to 3/4 cup water and let everything simmer on low for about 15-20 minutes. Serve on buns.
Thursday, April 21, 2011
pumpkin roll
I have always seen pictures of these on the side of the Libby pumpkin can, and I had extra cans of pumpkin in my lazy susan so, I decided to try out the recipe...plus, I like a good baking challenge. This recipe was actually really easy.

Libby's Pumpkin Roll (10 servings)
Cake:
powdered sugar
3/4 cup all purpose flour
1/2 tsp. baking powder
1/2 tsp. baking soda
1/2 tsp. ground cinnamon
1/2 tsp. ground cloves
1/4 tsp. salt
3 large eggs
1 cup granulated sugar
2/3 cup 100% pure pumpkin
1 cup chopped nuts (optional) - I left them out
Filling:
1 pkg. (8 oz.) cream cheese (softened)
1 cup sifted powdered sugar
6 tbsp. butter (softened)
1 tsp. vanilla extract
powdered sugar
For Cake: Preheat oven to 375 degrees. Grease 15x10 inch jelly roll pan; line with parchment paper. Grease and flour paper. Sprinkle a thin, cotton kitchen towel with powdered sugar.
Combine flour, baking powder, baking soda, cinnamon, cloves and salt in a small bowl. Beat eggs and sugar in large mixer bowl until thick. Beat in pumpkin. Stir in flour mixture. Spread evenly into prepared pan. Sprinkle with nuts (if desired.)
Bake for 13-15 minutes or until top of cake springs back when touched. Immediately loosen and turn cake onto prepared towel. Carefully peel off paper. Roll up cake and towel together, starting with narrow end. Cool on wire rack.
For filling: beat cream cheese, powdered sugar, butter and vanilla extract in small mixer bowl until smooth. Carefully unroll cake; remove towel. Spread cream cheese mixture over cake. Reroll cake. Wrap in plastic wrap and refrigerate at least one hour. Sprinkle with powdered sugar before serving, if desired.
Wednesday, April 20, 2011
sunday morning tradition
Our Sunday morning breakfast tradition is almond pancakes, whipped cream, fresh berries, syrup, sausage, eggs, juice, milk & a proper cup of coffee.
Here's a picture of Brendan making the pancakes on his 9th birthday. He was determined to grow his hair out until his birthday...


The almond pancakes are the best. Jeff's specialty... Sometimes we serve the pancakes with chocolate chips on the side. Other times we add bananas to the batter. They really are quite simple. Any pancake mix will do... Bisquick, Krusteaz, Dakota Maid, Hungry Jack. Make pancakes as package says, but also add about 2 teaspoons of almond extract for about 15-20 pancakes - we are big pancake eaters at our house, so we usually buy a bulk package. And, we all love our almond flavoring so much (wish I could find that in bulk.)
Tuesday, April 19, 2011
tamari chicken
Tamari Chicken
(adapted from Whole Foods)

2 T. tamari (a type of soy sauce)
2 T. lime juice (or less, depending on your citrus liking)
3 cloves garlic, minced
1 1/2 T. chopped fresh ginger
2 tsp. ground coriander
1 tsp. sugar
1/4 tsp. crushed red pepper flakes
2 lbs. boneless chicken tenders cut into 1 inch pieces. Marinate chicken in sauce for 24 hours.
Saute chicken and sauce until done over med-high heat. Serve with brown basmati rice pilaf.
Monday, April 18, 2011
brown basmati rice pilaf
I found this recipe on Whole Foods website - it's amazing and so much healthier than traditional rice pilafs.

Brown Basmati Rice Pilaf
adapted from Whole Foods
1 T. extra virgin olive oil
1 c. diced celery
1/2 c. diced shallots
1 c. brown basmati rice (washed & drained)
2 c. chicken broth
sea salt (to taste)
fresh ground pepper
Heat olive oil in large saucepan over medium heat. Add celery and shallots and saute for one minute. Add the rice and saute for another two minutes. Add broth, salt, pepper and bring to boil. Reduce heat to low, cover, and cook 40-45 minutes until broth absorbed. Serve with tamari chicken.
Serves 4-6.
Friday, April 15, 2011
turtles. an indulgent pleasure.
Jeff and I took the kids to Wisconsin Dells for Spring Break this year. First trip to the Dells and second actual presence in the state of Wisconsin. I guess there is a first time for everything. The kids swam, went down all kinds of waterslides, chased each other around and pretty much wore themselves out for 2 days.
Clare lost a tooth in the rough waters of the wave pool.

And, I won't say what Eleanor did. (Just be thankful this is a food blog... no more details there.)
Ordered a pizza from a local eatery - and it was ginormous. It was called the big kahuna- a 20" circle of cheese and sausage and pepperoni and sauce. Weighed a ton and took two adults to carry it to the table (not really, but almost!) Created about 3 separate meals for 6 of us (and I'm not kidding.)
Stopped by an old fashioned candy store and loaded up on goods. I always wonder about the huge colored lollipops that every child just HAS to have, so we buy it, they take one lick and it gets tossed in the garbage. What a waste. The only thing the lollipops have going for them is their good looks.
Besides the lollipop Dane had to have, Eleanor was happy as a clam with her strawberry shortcake flavored dum dum sucker. Clare and Brendan found salt water taffy, suckers, gold chocolate coins, jolly ranchers, caramel apple suckers and every color m&m you can imagine.
Other candy in our bags... gummy raspberries, cinnamon gummy dollar coins, coconut and red apple jelly bellys, sour fruit balls and caramels.
I knew what I wanted from the minute I saw it. It was behind the glass case, and only accessible by the candy lady behind the counter. Mmmm... a turtle.

Chocolate, caramel and pecans... and all the variations - macadamia nut, cashew, peanut. I prefer the pecans - they even look like real turtle feet! Amazing. Quite certain it was the most exclusive pick, and at a price, so Jeff and I decided to share.
Well, my idea of sharing quickly evolved into a family of curious and eager tasters. Everyone wanted a slice of the pie, or in this case, the turtle. Regardless, I so enjoyed my sixth of the turtle. And, maybe next time, Dane will skip the lousy lollipop and go straight to the glass case.
I'd feel so proud.
I may just have to try my hand at a homemade turtle (Kanwischer style.) I think I'd top mine with sea salt. There's something about sea salt and caramel.
Would really need to decide where my glass case at home would be. And, I'd most definitely need a lock. We have lots of little mice around.
Clare lost a tooth in the rough waters of the wave pool.

And, I won't say what Eleanor did. (Just be thankful this is a food blog... no more details there.)

Ordered a pizza from a local eatery - and it was ginormous. It was called the big kahuna- a 20" circle of cheese and sausage and pepperoni and sauce. Weighed a ton and took two adults to carry it to the table (not really, but almost!) Created about 3 separate meals for 6 of us (and I'm not kidding.)
Stopped by an old fashioned candy store and loaded up on goods. I always wonder about the huge colored lollipops that every child just HAS to have, so we buy it, they take one lick and it gets tossed in the garbage. What a waste. The only thing the lollipops have going for them is their good looks.

Besides the lollipop Dane had to have, Eleanor was happy as a clam with her strawberry shortcake flavored dum dum sucker. Clare and Brendan found salt water taffy, suckers, gold chocolate coins, jolly ranchers, caramel apple suckers and every color m&m you can imagine.

Other candy in our bags... gummy raspberries, cinnamon gummy dollar coins, coconut and red apple jelly bellys, sour fruit balls and caramels.
I knew what I wanted from the minute I saw it. It was behind the glass case, and only accessible by the candy lady behind the counter. Mmmm... a turtle.

Chocolate, caramel and pecans... and all the variations - macadamia nut, cashew, peanut. I prefer the pecans - they even look like real turtle feet! Amazing. Quite certain it was the most exclusive pick, and at a price, so Jeff and I decided to share.

Well, my idea of sharing quickly evolved into a family of curious and eager tasters. Everyone wanted a slice of the pie, or in this case, the turtle. Regardless, I so enjoyed my sixth of the turtle. And, maybe next time, Dane will skip the lousy lollipop and go straight to the glass case.
I'd feel so proud.
I may just have to try my hand at a homemade turtle (Kanwischer style.) I think I'd top mine with sea salt. There's something about sea salt and caramel.
Would really need to decide where my glass case at home would be. And, I'd most definitely need a lock. We have lots of little mice around.
Thursday, April 14, 2011
grilled salmon
Salmon. My most favorite all time preparation is grilled (and broiled or seared is a close second.) We grill salmon about once a week, especially in the summer time. We buy the long filet from Costco and we cut into wedges or small slabs. We let it reach room temperature, coat the salmon in olive oil and season generously with cracked pepper and kosher salt (both sides.)

We preheat the grill to 300 degrees and grill for 3-4 minutes, then flip over and grill the other side for the same or until done to your liking. Serve with couscous or a potato and a green veggie and you're set. I like a touch of fresh lemon juice with my salmon as well.


Note: Too much olive oil will cause flare-ups and smoke. If you have a gas grill and this happens, you will notice a propane like flavor and the salmon may turn a little gray/black from the smoke. I only know this because it's happened to me. And, I never like to ruin a fish as grand as salmon. Also, don't overcook, as the salmon will become dry.
Wednesday, April 13, 2011
mixed greens with apples & cider vinaigrette
This is a nice, light and refreshing salad - good for spring, summer and fall (especially with honeycrisp or haralson apples.) The dressing is the perfect complement to the mixed greens and tart apple.
1/4 c. apple cider vinegar
3 T. minced shallots
2 tsp. Dijon mustard
2 tsp. honey
1/2 c. olive oil
1 red or green tart apple sliced thin
mixed greens (I like to get a mix with arugula to add a bitter note as well.)
Combine vinegar, shallots, mustard, honey. Add oil and whisk or use immersion blender until well blended. Season to taste and combine with greens. Toss to coat.
Tuesday, April 12, 2011
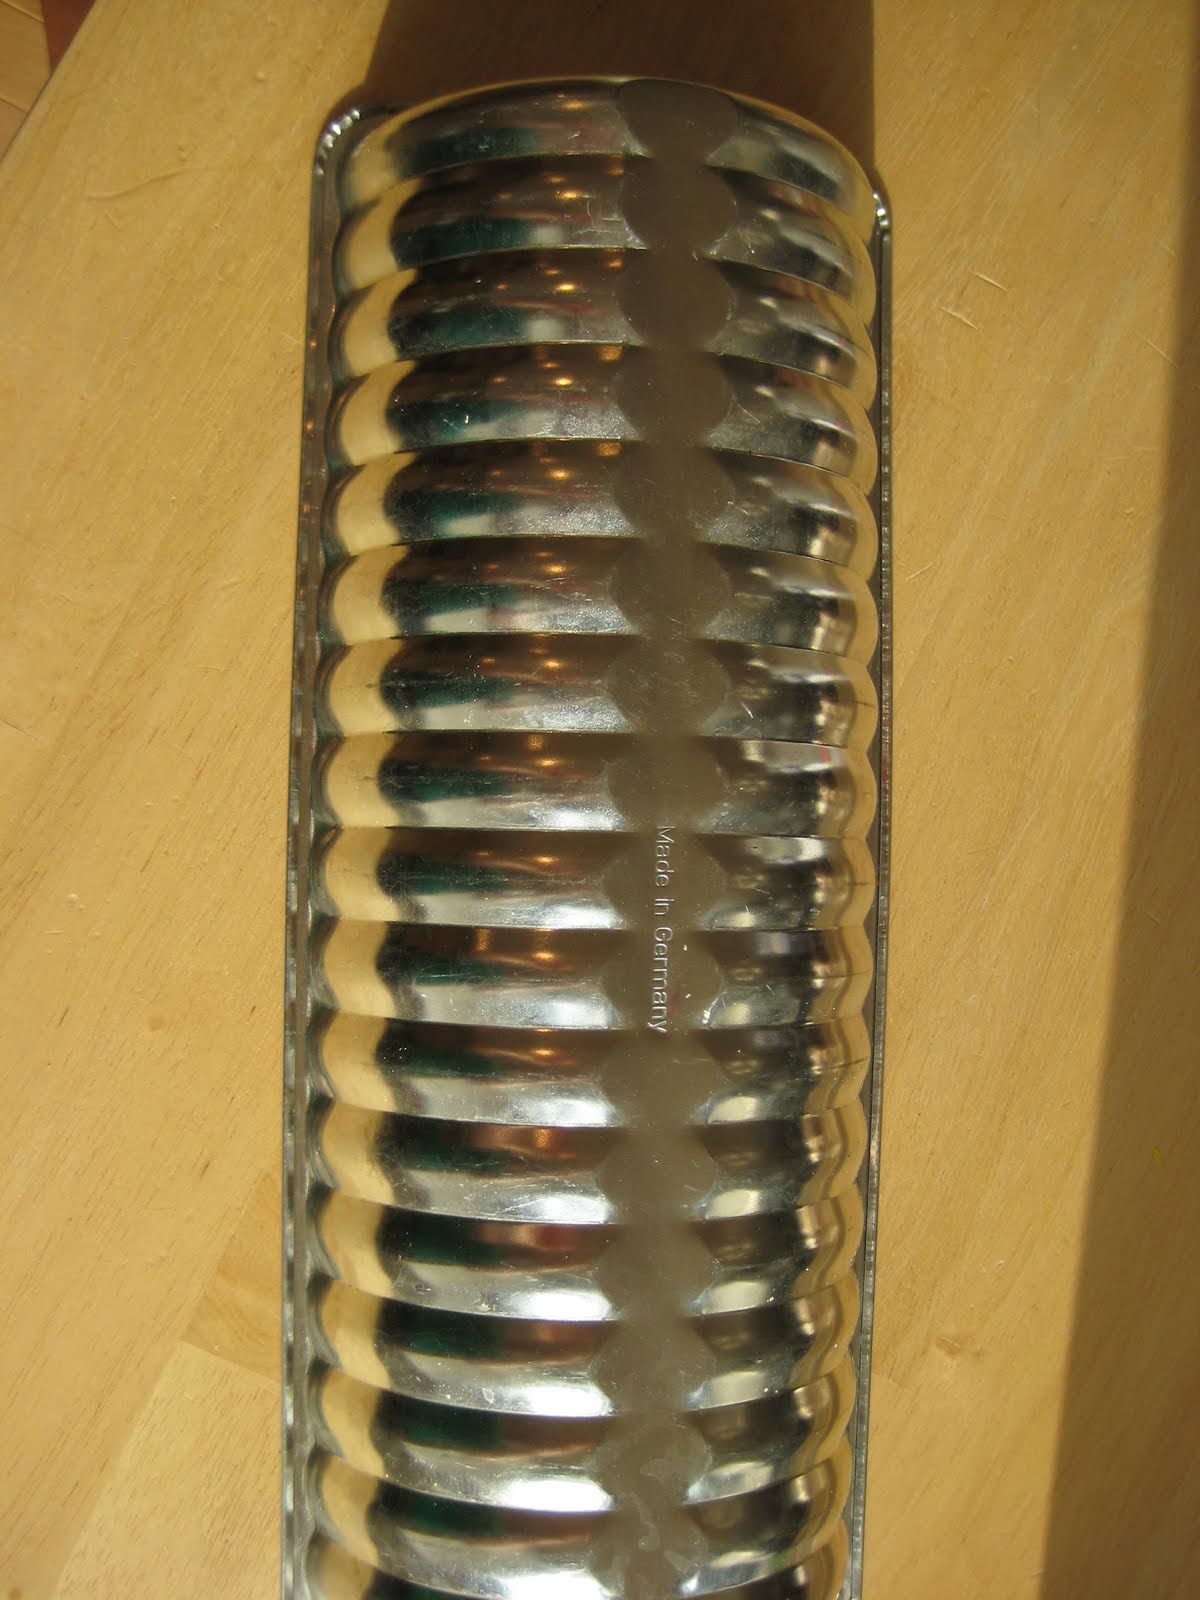
scandinavian almond cake
Mmmm... good... celebrating my Norwegian heritage with this one. Now, I must learn to make lefse.


You need a special pan for this one. I had Jeff get mine at a Scandinavian gift shop (even though the pan itself was made and manufactured in Germany - it's called rehruckenform, and looks like a ridged log.)


Note to self - you must follow recipe and be sure it stays in the oven long enough. First time I made it, I thought it was golden brown on the edges, but it was not baked in the middle. Ugh. I was so frustrated.
But, I am stubborn and determined, so I baked another one about a week later. This time, left in the oven for about an additional 15 minutes and it turned out much better. All was gobbled up within a couple of days.
Scandinavian Almond Cake
Spray pan with cooking spray.
1 1/4 c. sugar
1 egg
1 1/2 tsp. almond extract
2/3 c. milk
Beat these ingredients well.
Add the following:
1 1/4 c. flour
1/2 tsp. baking powder
Add:
1 stick margarine (I was told I must use margarine and not butter, but at some point, I may try butter. I'm not much a fan of vegetable oil spread.)
Mix everything well.
Spread in prepared pan. (Before adding batter, you can also sprinkle sliced almonds on the bottom...) Bake at 350 degrees for 50 - 60 minutes. Edges must be golden brown.

Cool in pan before removing. Cake will break if removed too soon. Sprinkle with powdered sugar or make almond frosting/glaze to drizzle on top. (Check out the almond puff pastry recipe, which has an almond frosting that would work.)
Cut and serve.


You need a special pan for this one. I had Jeff get mine at a Scandinavian gift shop (even though the pan itself was made and manufactured in Germany - it's called rehruckenform, and looks like a ridged log.)

Note to self - you must follow recipe and be sure it stays in the oven long enough. First time I made it, I thought it was golden brown on the edges, but it was not baked in the middle. Ugh. I was so frustrated.
But, I am stubborn and determined, so I baked another one about a week later. This time, left in the oven for about an additional 15 minutes and it turned out much better. All was gobbled up within a couple of days.
Scandinavian Almond Cake
Spray pan with cooking spray.
1 1/4 c. sugar
1 egg
1 1/2 tsp. almond extract
2/3 c. milk
Beat these ingredients well.
Add the following:
1 1/4 c. flour
1/2 tsp. baking powder
Add:
1 stick margarine (I was told I must use margarine and not butter, but at some point, I may try butter. I'm not much a fan of vegetable oil spread.)
Mix everything well.
Spread in prepared pan. (Before adding batter, you can also sprinkle sliced almonds on the bottom...) Bake at 350 degrees for 50 - 60 minutes. Edges must be golden brown.

Cool in pan before removing. Cake will break if removed too soon. Sprinkle with powdered sugar or make almond frosting/glaze to drizzle on top. (Check out the almond puff pastry recipe, which has an almond frosting that would work.)
Cut and serve.
Monday, April 11, 2011
a wall to remember
I decided to have Jeff paint a section of our kitchen wall with chalkboard paint. Three things prompted it - lack of a picture on the wall, something I'd seen on HGTV and in local restaurants, and I wasn't too concerned about losing any more value in our home by merely painting a chalkboard.
Jeff and I were working out to our "30 day shred" video one day and Jeff happened to knock a gigantic picture off the wall while doing some leg lifts (or some other fancy core work that Jillian has a special name for - I just can't remember, so I'll call them leg lifts.) It was loud, the picture was heavy and the glass shattered - all over. Luckily, no one was hurt, but the noise was great enough to get the attention of 2-3 perfectly content children. We were only 20 minutes into our workout at the time. Bummer. Picture went in the garbage. :(
A side note about the perfectly content children... if you're a parent, you'll know what I mean. Anytime the kids are playing and getting along and entertaining themselves, it's a beautiful moment. And, with any hope, that moment lingers for a long time. So, during that moment, you're careful to make sure you don't do anything. Anything at all to disturb or change that picture-perfect, happy suburban family, Pollyanna, smiling and cheerful 'Leave it to Beaver' TV ad (or however you'd like to think of it,) because those moments are precious and few and oh, so nice. So, when the picture fell off the wall, it ended the 30 minute workout and it disturbed the serene moment of brotherly/sisterly togetherness we see so seldom.
I wanted a place to write out our daily dinner menu, since I'm often pushed by the wayside as my children bust through the door and run to the oven or stove to see what we're having for dinner. I usually get my hugs and hello after they get that taken care of. I also wanted a place for the younger kids to be able to draw while I'm busy in the kitchen and necessarily don't want one of them attached to my hip while I'm near gas flames or hot water or whatever...
So, here's the small section that Jeff painted.

The first night, I titled the area with "MENU." And, I added our menu of Cajun chicken fettuccine, caesar salad and crusty bread, but the inner coach in Jeff suddenly erased my menu and replaced it with a basketball setup/play.

I haven't had the heart to erase it. And, as I stare at it longer, it looks more like a piece of art. So, our kitchen chalkboard may now be a permanent art form. And, there will always be a story behind it.
Friday, April 8, 2011
kid's cranberry citrus punch
Here's a great kid/adult punch recipe. Great for birthday parties or other celebrations, etc.
Kid's Cranberry Citrus Punch
1 (12 oz. can frozen cranberry concentrate)
3 1/2 cups fresh orange juice
1 liter lemon-lime soda
Combine all ingredients in a pitcher. Divide into smaller pitcher for easy serving. Serve over ice.
Kid's Cranberry Citrus Punch
1 (12 oz. can frozen cranberry concentrate)
3 1/2 cups fresh orange juice
1 liter lemon-lime soda
Combine all ingredients in a pitcher. Divide into smaller pitcher for easy serving. Serve over ice.
Thursday, April 7, 2011
shrimp sauce
Another great dipping sauce for fondue meats or veggies... similar to the Benihana version. (I like to mix a little of the ginger and shrimp sauce.)
Shrimp Sauce
2 c. mayo
1/2 c. water
1 tsp. sugar
1/4 tsp. salt
1 T. garlic juice
2-4 tsp. ketchup
1 tsp. ground ginger
1 tsp. hot sauce
1 tsp. dry mustard
1 tsp. paprika
3/4 tsp. white pepper
Whisk together and serve with cooked meats or veggies.
Shrimp Sauce
2 c. mayo
1/2 c. water
1 tsp. sugar
1/4 tsp. salt
1 T. garlic juice
2-4 tsp. ketchup
1 tsp. ground ginger
1 tsp. hot sauce
1 tsp. dry mustard
1 tsp. paprika
3/4 tsp. white pepper
Whisk together and serve with cooked meats or veggies.
Wednesday, April 6, 2011
ginger sauce
This dipping sauce is a fabulous accompaniment to meats and vegetables. We like to use it for our fondue, but it would also go well with grilled or sauteed foods. It's very similar to the ginger sauce served at Benihana's.
Ginger Sauce
1/2 c. chopped onion
1/2 c. soy sauce
2-3 garlic cloves (minced)
1 oz. gingerroot - peeled and chopped
juice of lemon
1 tsp. sugar
1/2 tsp. white vinegar
Blend well and serve with cooked chicken, beef, veggies.
Ginger Sauce
1/2 c. chopped onion
1/2 c. soy sauce
2-3 garlic cloves (minced)
1 oz. gingerroot - peeled and chopped
juice of lemon
1 tsp. sugar
1/2 tsp. white vinegar
Blend well and serve with cooked chicken, beef, veggies.
Tuesday, April 5, 2011
simple caramel rolls
My kids love waking up to caramel rolls when they visit my parents. And, on the weekends, I'll throw a batch together for a special morning treat.
This is an easy recipe - you just need to remember to get it ready the night before, so they're ready to pop in the oven the next morning.


Package of frozen cinnamon roll dough (I usually use Rhode's)
Caramel topping for rolls
2 cups brown sugar
1 1/2 - 2 cups heavy whipping cream
(Mix and spread in bottom of large jelly roll pan)
Place frozen dough on topping and leave lightly covered overnight. Rolls will rise by morning.
Bake at 350 degrees for approximately 30 minutes, or until golden brown.
Remove from oven and let cool for about 20 minutes, then turn pan upside down and let rolls fall onto a cookie sheet or other surface to serve them.
Monday, April 4, 2011
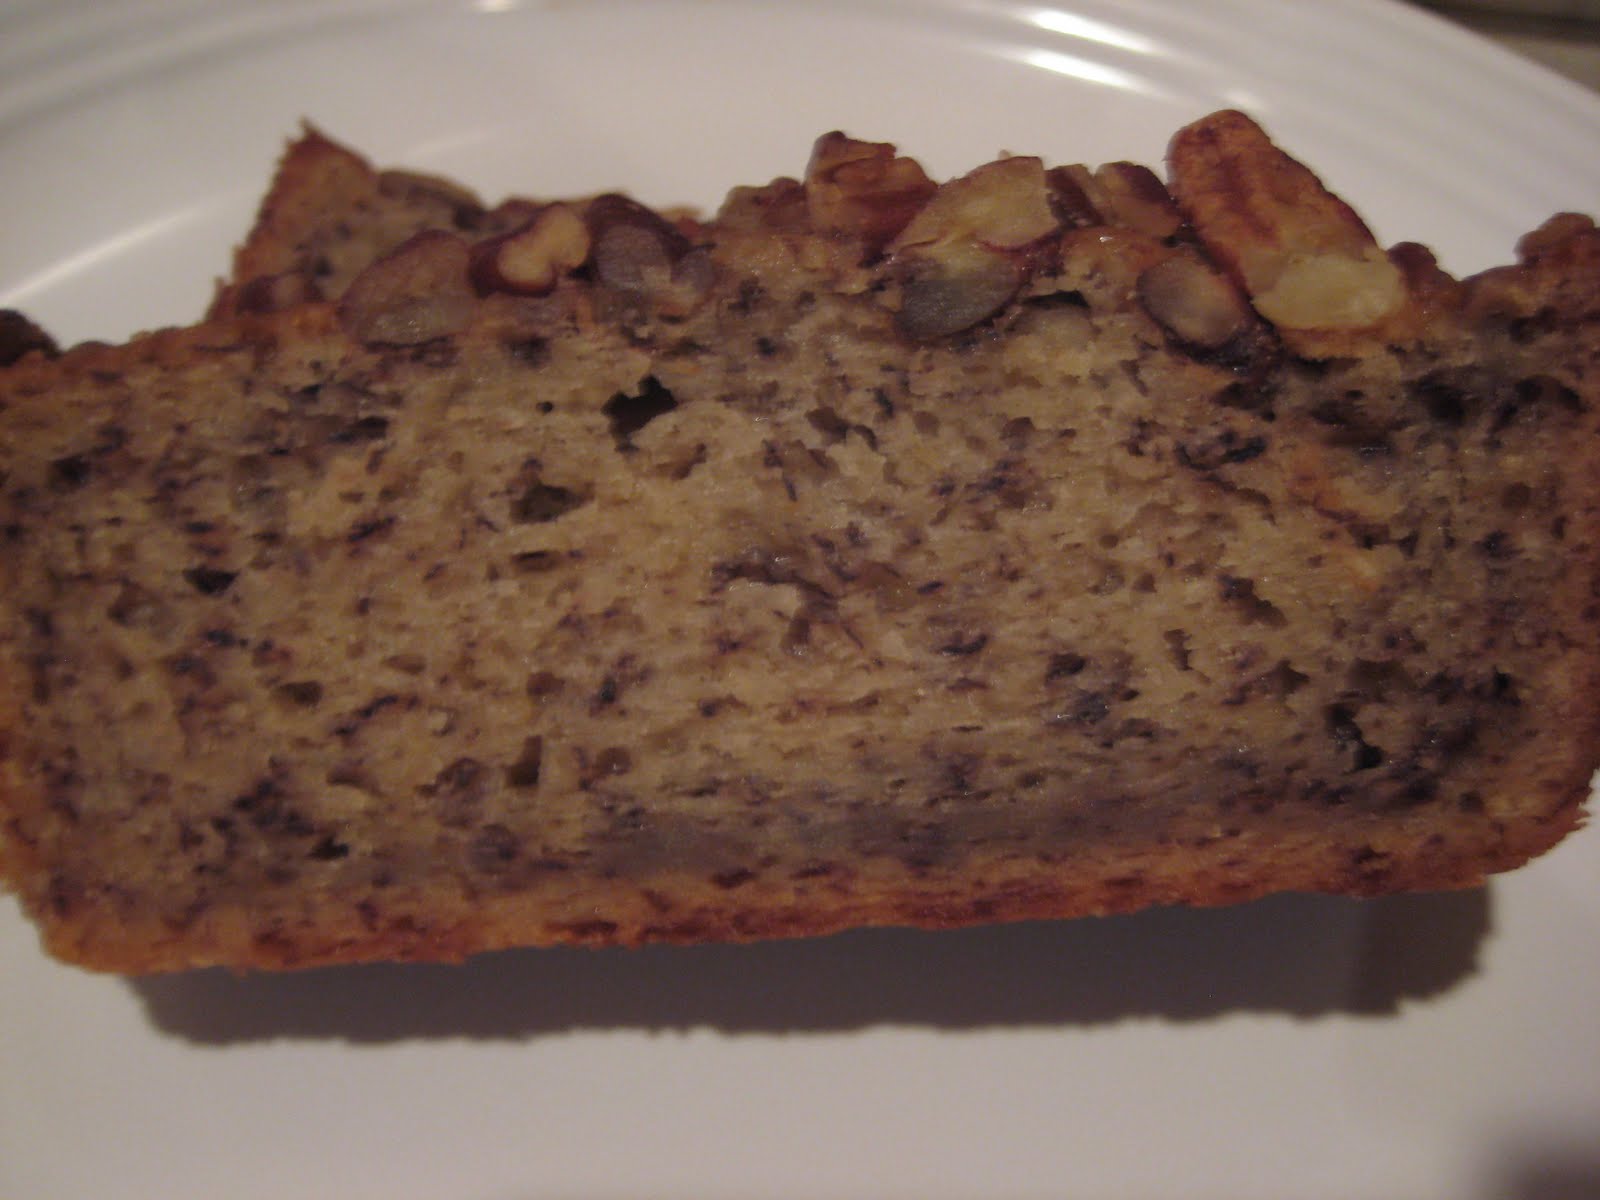
rural banana bread
We always have plenty of bananas around our house. Once the peels get brown spots, the bananas are usually a little too ripe for me to eat, but perfect for a few good loaves of banana bread. I like a recipe from my grandma Irene's cookbook titled - "Washington Lutheran Church, Rural Northwood, North Dakota." She had this recipe marked (among many others), but I've continued to use this one, as it hasn't failed me. Anything from rural North Dakota is a winner in my opinion, but I am a fellow North Dakotan myself. I like to top my loaves with pecans, as they become nutty and toasted while baking. You can also mix them in the batter or add other things like chocolate chips - or not. My kids prefer the plain jane version - no additions whatsoever.

Banana Bread
(recipe of Mrs. Jerry Mandt from the 1982 Washington Lutheran Church, Northwood, ND cookbook)

2 eggs
1 cup sugar
1/2 cup buttermilk
dash salt
1/2 c butter (room temperature)
1 tsp. baking soda
1 1/2 c. flour
3 bananas, mashed
Any add-ins as desired - i.e. pecans, chocolate chips
(I top batter with pecans before baking)
Batter can be divided among two smaller loaf pans or one larger loaf pan.
Mix ingredients well and bake in 350 degree oven for 1 hour or until done. Enjoy.

Banana Bread
(recipe of Mrs. Jerry Mandt from the 1982 Washington Lutheran Church, Northwood, ND cookbook)
2 eggs
1 cup sugar
1/2 cup buttermilk
dash salt
1/2 c butter (room temperature)
1 tsp. baking soda
1 1/2 c. flour
3 bananas, mashed
Any add-ins as desired - i.e. pecans, chocolate chips
(I top batter with pecans before baking)
Batter can be divided among two smaller loaf pans or one larger loaf pan.
Mix ingredients well and bake in 350 degree oven for 1 hour or until done. Enjoy.
Friday, April 1, 2011
the art of searing
My sister and I were just talking about how we love the crisp, caramelized goodness of seared meats. It creates amazing flavor, but it can be an oily, messy and smoky process. I found this advice on one of my fave sites - www.williams-sonoma.com.
Searing involves browning a food–typically meat, poultry or seafood–quickly over high heat, usually to prepare it for a second, moist cooking method, such as braising or stewing. For years, cooks believed that searing sealed in juices and kept the meat from drying out, but food scientists have proven that it does just the opposite, drawing juices to the surface and releasing them into the pan or fire.
Cooking meat over high heat with a small amount of fat sets off a series of reactions between the sugars and the proteins, essentially caramelizing the surface, which results in a more complex and richer flavor. The crisp, browned surface of a seared piece of meat is also more appetizing than the dull, gray look of meat that hasn't been properly browned before moist cooking.
When getting ready to sear, keep the following tips in mind:
Be sure to pat the meat or seafood dry with paper towels before searing, or the moisture will hinder proper browning. (This is a must. I've had unsuccessful searing occur when extra moisture is present. The searing turns into steaming - not good. Especially true for scallops, salmon, roasts, tenderloins...)
Use a large, heavy pan, such as a cast-iron fry pan or a Dutch oven.
Oil the food to be seared rather than the pan, because an oiled pan will soon start to smoke at the high temperatures needed for searing. (This is another must. I've set off many a smoke detector by a smoking pan. My sister recently told me about oiling the meat rather than the pan - great tip!)
Allow space between pieces of meat or one piece of meat and the sides of the pan. Too much food crowding the pan will lower the temperature, trap moisture and create steam, preventing the meat from browning properly.
Turn the meat frequently to brown it evenly on all sides.
Make the most of the pan drippings created by searing by deglazing the pan before continuing with the recipe. (Oooooh... deglazing is one of my favorites. The pan drippings and brown bits can be used to create amazing sauces. Whatever you do, don't wash the pan before you take advantage of the flavor.)
Thursday, March 31, 2011
creme brulee
"I think every woman should have a blowtorch." - Julia Child
Indeed, Julia's right. The first time I tried creme brulee, I was in love. The crispy, caramelized top is my favorite part of the dessert - a magical outcome of sugar and a kitchen torch. The creamy goodness below is just as divine.
Using my kitchen torch is likely the most controlled use of fire I'll ever experience in my lifetime. And, I feel so powerful - that's what I'm talkin' about.
I hope you enjoy this recipe as much as I do...
Creme Brulee
recipe & photo courtesy of Williams Sonoma

Ingredients:
1/2 vanilla bean
2 cups heavy cream
3 egg yolks
Pinch of salt
1/4 cup plus 4 Tbs. sugar
Directions:
Preheat an oven to 300°F. Have a pot of boiling water ready. Line a baking pan that is 2 to 3 inches deep with a small kitchen towel.
Using a paring knife, split the vanilla bean lengthwise down the middle and scrape the seeds into a 2-quart saucepan. Add the cream, stir to mix and set the pan over medium-low heat. Warm the cream until bubbles form around the edges of the pan and steam begins to rise from the surface. Remove from the heat and set aside to steep, about 15 minutes.
In a large bowl, whisk together the egg yolks, salt and the 1/4 cup sugar until smooth and blended. Gradually add the cream to the egg mixture, whisking until blended. Pour the custard through a fine-mesh sieve set over a bowl. Divide the custard among four 5- or 6-oz. ramekins and place the ramekins in the prepared baking pan. Add boiling water to fill the pan halfway up the sides of the ramekins. Cover the pan loosely with aluminum foil and bake until the custard is just set around the edges, 35 to 40 minutes.
Transfer the ramekins to a wire rack and let cool to room temperature. Cover with plastic wrap and refrigerate for at least 4 hours or up to 3 days.
Just before serving, sprinkle 1 Tbs. of the sugar evenly over each custard. Using a kitchen torch, melt the sugar according to the manufacturer's instructions. Serve immediately.
Serves 4.
Wednesday, March 30, 2011
spiced pork tenderloin
This has been a favorite pork recipe of ours - we usually grill the tenderloin. Adds a nice touch of smoky barbecue. The avocado salsa is the perfect accompaniment to the meat. We usually serve with buttermilk mashed potatoes and a green veggie. Enjoy.
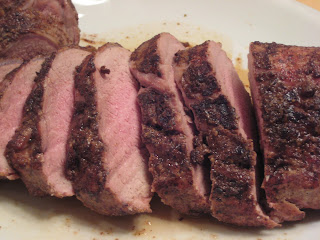
Spiced Pork Tenderloin and Avocado Salsa
Gourmet | April 2000
Yield: Serves 6
Active Time: 10 min
Total Time: 40 min
2 1/2 tablespoons coarse salt
1 tablespoon ground allspice
1 tablespoon cayenne
3 (3/4-pound) pork tenderloins
1 tablespoon oil
Accompaniment:Pineapple-Avocado Salsa
Preheat oven to 400°F.
Stir together salt, allspice, and cayenne. Pat pork dry and sprinkle spice rub all over pork, pressing to adhere.
Heat oil in a 12-inch heavy skillet over moderately high heat until hot but not smoking, then brown pork, 1 tenderloin at a time, on all sides, about 1 minute each. Transfer as browned to a large roasting pan and arrange 2 inches apart.
Roast in middle of oven until an instant-read thermometer inserted diagonally 2 inches into center of each tenderloin registers 155°F, 20 to 25 minutes. Let pork stand 5 minutes before slicing.
Note: meat can be grilled as well.
Pineapple-Avocado Salsa
Gourmet | April 2000
Yield: Serves 6
Active Time: 25 min
Total Time: 25 min
1 cup 1/4-inch-dice fresh pineapple
2 plum tomatoes, seeded and cut into 1/4-inch dice
1 firm-ripe California avocado, cut into 1/4-inch dice
1/2 cup chopped sweet onion
1/4 cup chopped fresh cilantro
1 1/2 teaspoons minced fresh jalapeño chile, including seeds
3 tablespoons fresh lime juice
3 tablespoons fresh orange juice
2 tablespoons extra-virgin olive oil
Stir all ingredients together and season with salt.
Tuesday, March 29, 2011
italian green salad
Have you ever had Olive Garden's house salad?! I really don't care for their pasta, etc., but could live off their all-you-can-eat salad and soup and breadsticks. mmmmm.....it's so good (as Mr. Food says.)
Don't know what it is about their salads, but they are the best - always served fresh, crisp and cold, which is a good start. Besides, what is there to love about a room temperature, limp lettuce salad, anyways?
I love how the flavors complement each other - combination of iceberg and romaine lettuce, sliced black olives, pepperoncini peppers, red onion, roma tomatoes, shredded parmesan, seasoned croutons and a nice italian vinaigrette. The tangy surprise bite of the pepperoncini peppers is my favorite. While many may push them to the side, I dig to the bottom of the bowl for them. Those and the black olives.
Here's a recipe I found on Google, and it appears to be a pretty close second to the real deal.
Italian Green Salad
adapted from Food Network
For the dressing:
•1/4 cup extra-virgin olive oil
•2 tablespoons white wine vinegar
•3 tablespoons Miracle Whip
•1 tablespoon lemon juice
•2 tablespoons grated parmesan cheese
•1/4 teaspoon garlic salt
•1/2 teaspoon dried Italian seasoning
For the salad:
•1 10-ounce bag American salad blend (I bought an Italian blend mix and doctored up with some fresh romaine lettuce.)
•1/4 red onion, thinly sliced
•4 small pickled peppers, such as pepperoncini
•1 small vine-ripened tomato, quartered
•2 tablespoons sliced black olives
•1/2 cup large croutons
•1 tablespoon grated parmesan cheese
Directions
Combine all the dressing ingredients and 1 to 2 tablespoons water in a blender or food processor; puree until smooth.
Place the salad blend in a large bowl and top with the remaining salad ingredients. Drizzle with the dressing. Serve in a chilled glass or aluminum bowl. Serve with pasta and/or bread.
Monday, March 28, 2011
citrus beauty
How beautiful is that? Grapefruit. So simple, yet so classic and amazing. So fresh - a glimmer of spring, during this March winter hangover. mmmm.

Growing up, I remember being fascinated by how my dad loved to eat a half grapefruit in the morning. He would split it in half, sprinkle generously with sugar and save the other half for the next day. I remember hovering over his bowl, as he used his serrated spoon to carve out the juicy, pink flesh. At the end, he would squeeze the remaining juice into his bowl and finish it - the best part.
I have the same love and appreciation for grapefruit today. And, Dane & Eleanor love it as well (so, I almost have to eat them by myself.) Otherwise, I'm often left with the juice at the end. There are different varieties of grapefruit, but I prefer the Texas red. In fact, just finished the last of them today. Must go to the store and stock up again...

Friday, March 25, 2011
lemon bars
These are tricky, I won't lie. And, very lemony. But, Ina Garten's recipes are usually winners, so thought I'd give the recipe a shot. I found cutting them into bite size pieces was the perfect dose of lemon for me, but they seemed to lose their form in such small bites. It was difficult to know for sure when the filling was "set" as the recipe suggests. I also think I whisked my filling just a little too much, as it got a little bubbly and frothy, and as a result, the tops of my bars were a little white. Good thing they're dusted with confectioner's sugar.
Surprisingly, my daughter Clare loved these. She tried to share her love with a friend, but her friend wasn't sold by the bars. I served the majority of them for a staff appreciation lunch for my kids' school and I got a kind note from one of the staff. They were gone, so hopefully, another good sign. Next time I make them, I may tweak the level of citrus. See what you think - enjoy!
Lemon Bars
(adapted from Barefoot Contessa)

For the crust:
 •1/2 pound unsalted butter, at room temperature
•1/2 cup granulated sugar
•2 cups flour
•1/8 teaspoon kosher salt
For the filling:


•6 extra-large eggs at room temperature
•3 cups granulated sugar
•2 tablespoons grated lemon zest (4 to 6 lemons)
•1 cup freshly squeezed lemon juice
•1 cup flour
•Confectioners' sugar, for dusting
Preheat the oven to 350 degrees F.
For the crust, cream the butter and sugar until light in the bowl of an electric mixer fitted with the paddle attachment. Combine the flour and salt and, with the mixer on low, add to the butter until just mixed. Dump the dough onto a well-floured board and gather into a ball. Flatten the dough with floured hands and press it into a 9 by 13 by 2-inch baking sheet, building up a 1/2-inch edge on all sides. Chill.
Bake the crust for 15 to 20 minutes, until very lightly browned. Let cool on a wire rack. Leave the oven on.
For the filling, whisk together the eggs, sugar, lemon zest, lemon juice, and flour. Pour over the crust and bake for 30 to 35 minutes, until the filling is set. Let cool to room temperature.
Cut into triangles or bite size pieces and dust with confectioners' sugar.
Surprisingly, my daughter Clare loved these. She tried to share her love with a friend, but her friend wasn't sold by the bars. I served the majority of them for a staff appreciation lunch for my kids' school and I got a kind note from one of the staff. They were gone, so hopefully, another good sign. Next time I make them, I may tweak the level of citrus. See what you think - enjoy!
Lemon Bars
(adapted from Barefoot Contessa)

For the crust:

•1/2 cup granulated sugar
•2 cups flour
•1/8 teaspoon kosher salt
For the filling:


•6 extra-large eggs at room temperature
•3 cups granulated sugar
•2 tablespoons grated lemon zest (4 to 6 lemons)
•1 cup freshly squeezed lemon juice
•1 cup flour
•Confectioners' sugar, for dusting
Preheat the oven to 350 degrees F.
For the crust, cream the butter and sugar until light in the bowl of an electric mixer fitted with the paddle attachment.

Bake the crust for 15 to 20 minutes, until very lightly browned. Let cool on a wire rack. Leave the oven on.
For the filling,

Cut into triangles or bite size pieces and dust with confectioners' sugar.
Subscribe to:
Posts (Atom)